I disappeared for a while. I got too focused on getting the quilts done and my family needed some time. I have been working on the quilts, don't worry, just not taking the time to post about it.
Bailey's quilt is basted.
I'm working on getting Seth's marked and then I will baste it. That pretty much needs to happen today because today may be the last time the weather will be good enough for me to use the spray adhesive outside.
Sunday, November 28, 2010
Friday, November 12, 2010
The Right Equipment
I got a new toy today!
 Just the black thing, not the sewing machine. What does it do? Well it helps me move my quilt around more easily so that I can machine quilt it faster.
Jamie and I played around with it a little tonight and though we are pretty novice at using it, we did a lot of quilting in a very short amount of time.
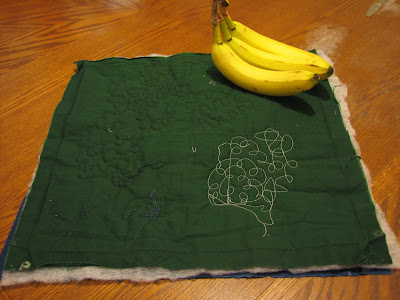 It's not the best looking little quilt. The cloth and batting was just stuff I had lying around. The stitches in white show up a lot better, but there are some in black on the left. The bananas are to give you a reference. I'd say that we covered more than half of the area and did it in less than 15 minutes. The stitches are much smoother and I could let the machine sew much faster than with just my machine.
I'm so excited. Now, I just need to get those two quilts ready to start quilting, but I also need some sleep. Slow steady progress is just the thing, right?
Jamie and I played around with it a little tonight and though we are pretty novice at using it, we did a lot of quilting in a very short amount of time.

 |
| Jamie's contribution. I think he did really well. |
 |
| A close up of the stitching. |
Elephants Never Forget
And I'm not an elephant. I forgot to take some pictures of the details of Abby's quilt. And, I forgot to write a post yesterday.
So, I'll make up for it today. Here's the pictures of Abby's quilt:

And here are some close-ups of the stitches (and yes it was my first quilt done on a machine, so I'm really embarrassing myself here, don't look too close).
Just another layer to really personalize the quilt.
So, I'll make up for it today. Here's the pictures of Abby's quilt:

And here are some close-ups of the stitches (and yes it was my first quilt done on a machine, so I'm really embarrassing myself here, don't look too close).
 |
| Clouds on the blue cloth above the flowers |
 |
| Stripes stitching to help it look more like grass. |
 |
| Tulip detail on the yellow and pink. (I cheated and used my embroidery machine to do these. I just used the same pattern that I used on the flowers but only the straight stitch parts.) |
Wednesday, November 10, 2010
Machine Quilting
Evelyn,
I hope this answers your question.
I think that it is hard to imagine what you can do with a sewing machine and a quilt. The layers give you the ability to create wonderful textures. That is what the patterns that I posted yesterday are all about.
Here's a machine quilted quilt:

The paisleys are all machine sewn onto the quilt with decorative thread.

This closer shot shows more detail, making it easier to see the stippling (the meandering pattern on the black cloth done in black thread). The stippling adds texture to the quilt. That is the sort of effect I'm going for on the quilts. Seth's pattern instead of being the meandering pattern will be the cars and Bailey's will be planets and stars. From a distance the quilts will look the same, but up close the textures will be more pronounced and you'll be able to see that they are not the same.
You can read more about this particular quilt here: Paisley Pavane
Tomorrow, I'll post some close ups of Abby's quilt. It has some of what I'm talking about on it.
Tuesday, November 9, 2010
Why Not Just Tie It?
One thing that really drew me into machine quilting is that you could add another dimension to ghe quilt when doing the actual quilting. These two quilts are going to look exactly the same, until you get up close. Then you'll notice that they are indeed as different as the boys they belong to.
I spent today trying to finalize the pattern I'm going to quilt on the quilts. (I'm sick so rest is very much at the top of the priority list right now which unfortunately is making me even farther behind.)
Seth's quilt is going to have something like this:

And for Bailey's I thought that we would just do connected stars, but then Jamie and I were talking about it and decided that it would be cool to do some planets with stars filling in the gaps. We drew up a couple of planets to see what we could come up with.

This is probably the best one we got from our 15 minute sketching session. Hopefully I can get Bailey's figured out tomorrow and get this quilt factory moving again.
Monday, November 8, 2010
The Solution
To solve the puzzle we started out by replacing the cloth with numbers. Originally, we did that because it was easier than trying to draw up another pattern and I didn't want to cut apart my original one. Jamie and I figured out a layout pretty quickly that would require us to throw away three or four squares. I was fine with that, I didn't want to spend a ton of time trying to find a solution.
I knew that a computer could solve the problem, but I don't know how to do that. Jamie, being a mathematician and wanting the most elegant answer, took the problem to work and got a solution from a co-worker.
The numbers that we assigned to each cloth type now became critical in figuring out the solution. Putting the tiles into a computer and telling the computer to match them up I'm sure is a pretty simple thing to do, something I wish I knew how to do, but don't. I ended up with a list of numbers. From that point I was able to reconstruct what the nine patches should look like:

From the solution, I was also able to figure out what the most probable identity of the thrown away square was.
 The key was the every cloth type had nine squares, except the blue dot and line piece.
So, when your kids ask you why they have to learn math, you can tell them that some day they might want to make a quilt and that they might have to figure out the easiest way to do that, and that a little bit of math might save them a whole lot of time and frustration.
I knew that a computer could solve the problem, but I don't know how to do that. Jamie, being a mathematician and wanting the most elegant answer, took the problem to work and got a solution from a co-worker.
The numbers that we assigned to each cloth type now became critical in figuring out the solution. Putting the tiles into a computer and telling the computer to match them up I'm sure is a pretty simple thing to do, something I wish I knew how to do, but don't. I ended up with a list of numbers. From that point I was able to reconstruct what the nine patches should look like:

From the solution, I was also able to figure out what the most probable identity of the thrown away square was.

So, when your kids ask you why they have to learn math, you can tell them that some day they might want to make a quilt and that they might have to figure out the easiest way to do that, and that a little bit of math might save them a whole lot of time and frustration.
Sunday, November 7, 2010
Quilting and Math
I'm just sewing the squares together and marking for the next few days, so the posts are going to be a little more varied than just where I am on the quilts.
Sewing involves quite a bit of math. You have your standard measurement problems that help you to decide how big to make something or how much fabric you need to by. There's also way that you cut a piece of flat fabric to fit it together with another piece of flat fabric to make something that fits over a three dimensional object (usually a person) is an interesting mathematical puzzle. Take sleeves for instance. Look at your shirt, hold your arm out to your side. Pretty much it looks like a rectangle was cut and sewn to the other rectangles that make up the body of your shirt. But, the basic sleeve shape is really this:

I remember being pretty surprised by that shape when I made my first garment with a sleeve. Of course I was only 12 or 13 and hadn't really though about it, but even as an adult I don't think it is obvious that in order to get sleeves you should cut something out that looks like that. Of course the apparent rectangles that make up your shirt, aren't really rectangles, which I'm sure you've guessed by now.
Quilts are pretty straight forward in their layout, doesn't really seem like much math is going on with my quilt, just the basic, what size how much fabric to purchase sorts of things, but in the planning stages we had an interesting puzzle to solve. I laid out my plan based on the original photograph I found.

I simply replaced the fabric in this quilt with the ones that I had picked for my quilt. For instance the blue with stars on it replaced the black squares, the stripes replaced the blue with thatch marks, etc.

That was before I found out about the trick to make the squares. Once I realized that making the nine patches and then cutting them, was so going to be much easier that piecing all the squares and rectangles together individually, I needed to figure out how to construct the nine patches so that I could get the resulting squares with a minimum of waste.
I figured that who ever made the green quilt had made 9 nine-patches and cut them into 36 squares and then had one that was wasted. So we went to work trying to figure out the patches.
To be continued...
Saturday, November 6, 2010
The Plan
My biggest concern about attempting quilts for my boys was that they are seven years apart. I didn't want to have something that was too cute for Bailey, or something that was too grown up for Seth. I also wanted to have something that the boys could use until they wear out. I was inspired by Pottery Barn's patchwork quilts that they are currently selling, so I began looking for patchwork quilts. The nine patch pattern seemed perfect, so I drew up a plan:

I like my drawing so much that I've been a little scared to see it all put together, but I think it looks awesome!

It's not sewn together, but I had to organize the squares and I wanted to see what the quilt would look like, so I laid it out. The picture really doesn't do it justice. I'll get a better one after I get them pieced together and can take it outside and get some better lighting. The yellow things are papers that help me to know where to put the square.
I'll probably stay up for a little tonight working on sewing the squares together.
Friday, November 5, 2010
Disappering Nine Patches
When I was first looking for ideas for these quilts I knew that I wanted to do something a little more traditional than the quilts I was working on for the girls, but I still wanted it to have modern elements.
The traditional element that forms the basis of this quilt is the nine patch. The name is pretty much self-explanatory. You sew together nine squares of the same size, easy peasy and they look like this:

Quilts made using this easy nine patch date back to the beginning of the 19th century. Nine Patch Quilt Patterns has a short history and a few examples of some early nine patch quilts.
The origins of the disappearing nine patch pattern are not certain, but it seems to have made it's first appearance in a book "Magic Pillows, Hidden Quilts" by Karin Hellaby. In that book Hellaby refers to the quilt pattern as "Nine Patch Magic". The book was published in 2002.
Now that I have the 19th century nine patch made, I get to bring it into the 21st century by cutting it into quarters, like so:

Today, I get to cut all 18 of the nine patches into quarters, and arrange them in order to sew them together.
I doubt I'll get to sewing them together today, but here's to hoping.
Thursday, November 4, 2010
Wednesday, November 3, 2010
Still Behind, But Moving Along
Five more to go, then cutting to make the disappearing nine patch. Pictures tomorrow.
Tuesday, November 2, 2010
A Day With the Family
The state we live in gets election day off of school, so we spent the day as a family. My plan was to sew the nine patches together after we got back. But first we had scouts and then getting the kids to bed.
I worked on the patches after the kids went to bed, and was making good progress, but then I noticed a problem. I had stitched several of the patches so that they were reflections of what they should have been. If I held the patch up in the mirror it looked right, but when I looked at it straight on, it was wrong. I switched left and right. I will spend tomorrow undoing that mistake and finishing as many of the patches as I can. That puts me hopefully only one day behind.
I worked on the patches after the kids went to bed, and was making good progress, but then I noticed a problem. I had stitched several of the patches so that they were reflections of what they should have been. If I held the patch up in the mirror it looked right, but when I looked at it straight on, it was wrong. I switched left and right. I will spend tomorrow undoing that mistake and finishing as many of the patches as I can. That puts me hopefully only one day behind.
Monday, November 1, 2010
The Begining
Here's the squares (all 180 8 1/2" squares!):
 I cut them 8 at a time with my rotary cutter and the special square ruler you can see on the star cloth. I highly recommend getting a rotary cutter if you are going to do any patchwork quilting. I'd still be cutting away if I didn't have mine.
And I was able to get a little ahead and sewed one of the nine patches together! I'll explain in more detail about these tomorrow.


And I was able to get a little ahead and sewed one of the nine patches together! I'll explain in more detail about these tomorrow.

Subscribe to:
Posts (Atom)